Tuesday, March 29, 2016

no ties


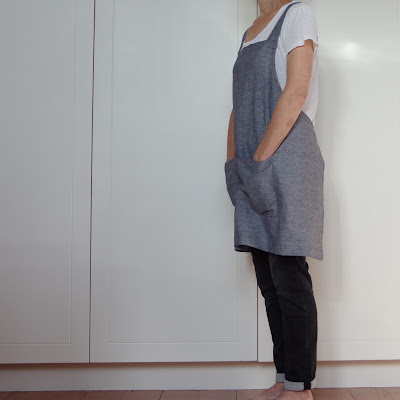
I've been searching - in vain - for a pattern for a simple, crossover, Japanese-style apron. So I decided to give it a go myself. I copied the basic shape from an old barbecue apron, extended the sides and added a divided pocket. I used linen but calico or denim would also be good.

One size should fit most but I've tried to make the pattern a bit adjustable so you can alter the length of the straps and the apron itself.

To make one you'll need:

1.4m of 115cm wide fabric
pattern

1. Cut one apron piece on the fold, two straps on the fold and one pocket on the fold. All seam and hem allowances are included on the pattern.

2. Hem the curved sides of the apron - fold over a 1cm hem and baste. Fold the hem over again and stitch close to hem edge.

3. Hem the straight sides of the apron - fold over a 1cm hem and baste. Fold the hem over again and stitch close to hem edge.

4. Hem the top edge of the bib: fold to the inside a 1cm hem along the top of the apron and press. Fold again to make a 3cm hem. Stitch in place.

5. Make the straps: Fold the straps longways with right sides together and sew a 1cm seam down the long edge. Press the seam open and turn the straps right side out. Flatten the straps with the seam centered.

6. Attaching straps to front: Fold in 1cm on the narrow edge of each strap and hand or machine stitch across to close the opening. Place apron on a flat surface with the wrong side facing up. On each side of the bib pin a strap, seam side facing up. Match the long side edge of the strap with the outer edge of the bib and have the bottom edge of the strap lined up with the hem of the bib. Stitch in place.

7. Make the pocket: Fold under a 1cm hem (wrong sides together) along one long side. Fold again to  to make a 3cm hem. Stitch. Fold under 1cm on the other three sides. Place apron on a flat surface with the right side facing up and pin pocket where you think you'd like it. To centre the pocket. Fold the apron in half longways and press. Fold and press the pocket. Match up the folds.

8. Pinning straps to back: Without twisting the straps, pin the end of each one to the inside of the opposite back corner. Try on the apron. Adjust the length of the straps. Keep pinning until it seems right. Take the apron on and off a few times to make sure the straps aren't too short. Also adjust the apron length and pocket placement.

10. Attach the pocket. Sew close to the edge all round. Top stitch if you like. Sew a seam down the middle of the pocket.

11. Attaching the straps to back: Mark where the strap meets the top edge of the apron and trim off any excess so that there is 5cm of strap extending beyond the back of the apron. Fold in 1cm on the bottom edge of the strap and hand or machine stitch across to close the opening. Pin the straps on the inside of the apron matching up with the edge of the apron. Try the apron on again just to make sure the straps aren't twisted. Sew the straps in place.

12. Hem: Cut the lower edge as necessary to correct length. Fold up the lower hem by 1cm and then again by 3cm. Stitch close to fold.

Alternative patterns at Purl Soho and Good Magazine.

Reading: The thin man by Dashiell Hammett. This is a detective story first published in 1934. Everything is "swell" and many Scotch and sodas are consumed. It opens with "I was leaning against the bar in a speakeasy on Fifty-second Street..."
Monday, March 21, 2016

plants


After reading Indoor green: living with plants by Bree Claffey I was inspired to try some houseplants of my own. So I've started off with this Calathea rufibarba - aka Velvet Calathea or Furry Feather Calathea. The leaves have wavy edges and purple undersides. Apparently it likes low light conditions which is perfect for indoors, I think. 
I haven't had much luck with houseplants except for a few succulents and cacti. I recently repotted my favourite cactus. The photos were taken in 2013, 2014 and a couple of days ago. It's amazing how much it's grown and how desperate it was for a bigger pot. Sorry, cactus.

Reading: In order to live: a North Korean girl's journey to freedom by Yeonmi Park

Listening: Cerulean salt by Waxahatchee

Monday, March 14, 2016

plumdog


I've just finished reading this great book/graphic novel - Plumdog by Emma Chichester Clark. It's a diary of sorts and spans a year in the life of Plum, Emma's "whoosell" (whippet, Jack Russell, poodle cross). Written by Plum, illustrated by Emma. It captures a dog's life so well. After reading it I felt a little sad and missing my Louie.

Plumdog (the book) started life as a this blog. I was inspired to think I could start a similar thing for my cats but cats don't do anything really, do they? Eat, sleep, preen.

(other) Reading: My name is Lucy Barton by Elizabeth Strout who wrote Olive Kitteridge that you may have seen on tv.

Making: Rhubarb jelly - it's astoundingly good if you like rhubarb. I made this BBC recipe. I think it's not necessary to add the layer of reserved cooked rhubarb but you might like to.

Monday, March 7, 2016

nut butter


I have been making my own almond butter. It's so good. You might like to make some yourself. 

To make about 250ml of almond butter you'll need

2 cups of unsalted dry roasted almonds
salt (optional, about 1/4 tsp)

Line a baking tray with baking paper and heat the almonds in an oven preheated to 180ÂșC for 10 minutes.
Tip the hot almonds into your food processor and process - stopping from time to time to scrape down the sides of the bowl - until you get a nice sloppy consistency. 
Store in a sterilized jar.

+ Heating the almonds seems to speed up the release of oil in the nuts.
+ The blending takes me about ten minutes but this may vary depending on how powerful your processor is. When you start processing the almonds first turn to a dry sand-like consistency, then start to clump together and finally become oily and sloppy. It seems to take ages, but stick with it.
+ You could start with any amount of almonds. But two cups fits perfectly into my small baking tray and is easily managed by my food processor. Plus I have a few jars with lids that are the perfect size. 

I hope you get round to making some. It's great on toast.

Listening: Ivy Tripp by Waxahatchee 

Reading: Indoor green: living with plants by Bree Claffey from Mr Kitly

Wednesday, March 2, 2016

museum


A recent visit to the Crown Lynn museum (te toi uku) with my granddaughter (who tells me she is very cute. I can't deny it.) The museum is small but fascinating especially for kiwis - most of us grew up with Crown Lynn. My aunt had a full dinner set of Fiesta Ware - white with multi-coloured spots randomly scattered across a grey (sort of) grid pattern. With pastel coloured cups to match the spots. All displayed in glass-fronted cupboards. As a 12-year-old it was my dream kitchen.

The museum has lovely crowded displays - cup handles rescued from the rubble of the old factory and cups and mugs showing the huge variety made over the lifetime of Crown Lynn. I love the child's cup. The little green cart being towed along by the sleepy looking snail has Express Parcels Co. written on the side. I guess life was a little slower back in 1955.

Plus some Crown Lynn I bought recently for my own small collection. Happy days for Tasman Pulp and Paper when the number 2 newsprint machine was officially opened on 8 May 1963. I just like the sailing ship logo.

Reading: The stories of Bill Manhire - collection of short stories by NZ writer

Eating: Figs from our tree